Inserting A Sleeve In Few Easy Steps

easy to sew -sleeve

As you step on to the advanced sewing levels, the first thing that comes to your mind is attaching a sleeve to the garment. There are several methods to insert a sleeve, however adopting exemplary methods enable you to offer a professional touch. The Mathilde Blouse pattern provides wholesomeness at the armhole. It is one of the renowned sewing patterns that is practiced widely. You can also utilize this method to attach sleeves to your various other projects. Before getting on the machine, it is essential to understand the basic concepts involved. The Mathilde method grants a wholesome approach to support the curves of the fabric.

The sleeves are given a unique look as it stands distinguishably. Most often, the sleeve head remains bigger, say about two centimeters larger than the opening for the arms. But in the case of the Mathilde blouse, space is even greater. An enlarged area adds more details to the design. Make use of this excess garment to add volume. Gather the extra fabric at the sleeve’s circumference and align it with the armhole during sewing. Now, with the additional size you can sleek in your shoulder better. If this style of stitching does not fascinate you, don’t worry there is an alternate route.

sleeve1

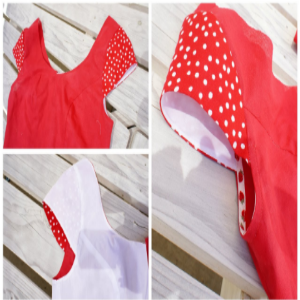
You can also insert sleeves in a similar pattern that is followed in your shirts and tee shirts. The sleeves can be attached in a flat position that remains against the opening for the arm. You can then join the side seam of the body with the underarm of the sleeve. It is now time to thread your machine to begin sewing. Mark a starting and finishing point at different notches of your fabric. Start stitching three rows that remain parallel. Leave appropriate spaces between the three rows. Never overlap with the seam lines and there you attach your sleeves comfortably well.

Read also – Familiarizing Yourself With The Know-Hows Of The Sewing Machine

Stitching The Zigzag Way To Finish Your Seams

zigzag stich

It is imperative to learn the patterns of zigzag stitching to offer a quality touch to your sewing project. The zigzag stitches shall avail a tidy and ordered look to your seams. It also prevents the garment from tattering and unraveling. You can complete the zigzag stitching within a few minutes of time. It is a fantastic option to explore owing to its simple attributes. The stitches can be turned purposeful when you have to finish without overlocking. You can always opt for an overlock foot to simplify your stitching. The little metal flap of the overlock foot aligns the fabric and the stitching procedure.

Now let’s move on to the practical part. Begin stitching the seams in the usual format. As you finish, cut them. But make sure to avail a few mm space to lodge the zigzag stitches. Then to begin the zigzag stitches, it is essential to customize your sewing machine. For the setup, position the overlock foot on the sewing machine. Carrying out a trial run is necessary. Assess the tension and width of the stitches during the test run. Refer to the manual to make appropriate changes. As the fabric edge touches the metallic flap of the overlock foot, begin stitching along the first seam.

Sewing on a sheer, lightweight fabric requires a more careful approach. You can either opt to sew both the seams aligned together as a single unit or stitch them distinctly. The right-side end of your zigzag stitch must touch the fabric’s edge. Never back tack at both the ends. Instead of back tacking, you can connect the loose ends of the threads with a double knot. Ensure a double knot at both the ends to secures your stitches. Then trim away the excess threads. Finally, it is time to press the seams based on the pattern you have stitched. So, here you complete the seams in the right way.